Access Gateway Configuration
Prerequisites
Before beginning to configure your Magma Access Gateway, you will need to make sure that it is running all services without crashing. You will also need a working Orchestrator setup. Please follow the instructions in "Deploying Orchestrator" for a successful Orchestrator installation.
You also should have completed all the steps in "Access Gateway Setup (On Bare Metal)". For this part, we strongly recommend that you SSH into the AGW box from a host machine instead of using the AGW directly.
Magma Access Gateway has a default APN "oai.ipv4" that can be used by UEs to access Magma in a non-federated set up. UEs must be configured manually with "oai.ipv4" as their APN to be able to complete the attach procedure at Magma Access Gateway out of the box.
Access Gateway Configuration
First, copy the root CA for your Orchestrator deployment into your AGW:
HOST$ scp rootCA.pem magma@10.0.2.1:~
HOST$ ssh magma@10.0.2.1

AGW$ sudo mkdir -p /var/opt/magma/tmp/certs/
AGW$ sudo mv rootCA.pem /var/opt/magma/tmp/certs/rootCA.pem
Then, point your AGW to your Orchestrator:
AGW$ sudo mkdir -p /var/opt/magma/configs
AGW$ cd /var/opt/magma/configs
AGW$ sudo vi control_proxy.yml
Put the following contents into the file:
cloud_address: controller.yourdomain.com
cloud_port: 443
bootstrap_address: bootstrapper-controller.yourdomain.com
bootstrap_port: 443

rootca_cert: /var/opt/magma/tmp/certs/rootCA.pem
Then restart your services to pick up the config changes:
AGW$ sudo service magma@* stop
AGW$ sudo service magma@magmad restart
Creating and Configuring Your Network
Navigate to your NMS instance, https://nms.yourdomain.com, and log in with the
administrator credentials you provisioned when installing Orchestrator. If this
is a fresh Orchestrator install, you will be prompted to create your first
network. Otherwise, select "Create Network" from the network selection icon
at the bottom of the left sidebar. Select lte as the network type and fill
the other fields as you see fit.
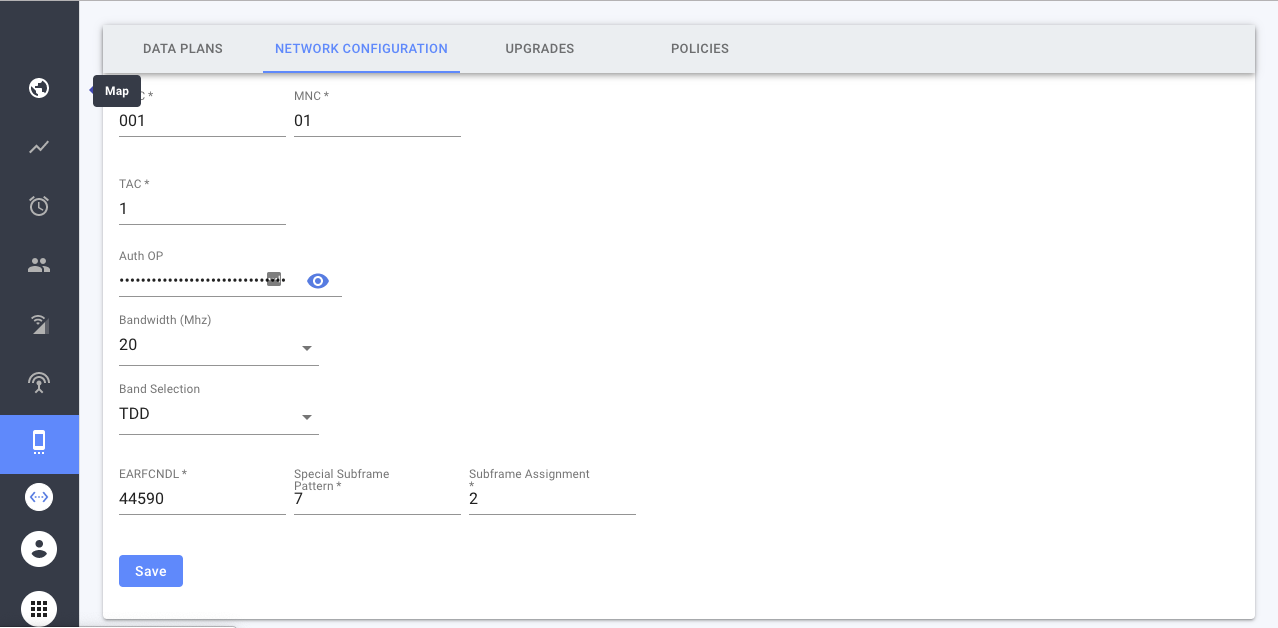
Go back to the network management app using the app selector in the bottom left of the screen, then go to "Configure" in the left sidebar, followed by the "Network Configuration" tab at the top of the screen. Configure your RAN and EPC parameters which are appropriate for your hardware setup.
Registering and Configuring Your Access Gateway
You need to grab the hardware secrets off your AGW:
AGW$ show_gateway_info.py
Hardware ID:
------------
1576b8e7-91a0-4e8d-b19f-d06421ad72b4

Challenge Key:
-----------
MHYwEAYHKoZIzj0CAQYFK4EEACIDYgAECMB9zEbAlLDQLq1K8tgCLO8Kie5IloU4QuAXEjtR19jt0KTkRzTYcBK1XwA+C6ALVKFWtlxQfrPpwOwLE7GFkZv1i7Lzc6dpqLnufSlvE/Xlq4n5K877tIuNac3U/8un
Navigate to "Gateways" on the NMS via the left navigation bar, hit "Add Gateway", and fill out the form using the hardware secrets from above:
After you create your gateway, hit the Edit icon in its table row, select the "LTE" tab, and configure your EPC/RAN parameters. Make sure you enable enodeB transmit.
At this point, you can validate the connection between your AGW and Orchestrator:
AGW$ journalctl -u magma@magmad -f
# Look for the following logs
# INFO:root:Checkin Successful!
# INFO:root:[SyncRPC] Got heartBeat from cloud
# INFO:root:Processing config update gateway_id
If everything looks OK, you can move on to configuring your enodeB.